Image Compressor
Make your images smaller without making them look bad. Drop in one photo or a whole batch, pick a quality level and format, compare the result against the original side by side, then download. Everything happens on your device — nothing is uploaded.
or click to choose files
How to compress an image
- Add your images. Drag one or many files onto the box, or click it to pick them. Every file is processed at once and listed with its old and new size.
- Choose a format. JPEG for photographs, WebP when you want the same look at a smaller size, or “keep PNG” for logos, screenshots and anything with sharp edges or transparency.
- Set the quality. Start at 0.75 and drag lower while watching the side-by-side preview. The moment you can see a difference, go back one notch.
- Limit the width if the image is huge. Tick “also limit the width” and enter something like 1600 px. For a photo that will only ever be viewed on a web page, this alone often removes more bytes than the quality slider.
- Download. Use the button on a single row, or “Download all” to save the whole batch one file after another.
How image compression actually works
There are two fundamentally different things people call “compression”, and knowing which one you are using explains almost every surprising result.
Lossy compression (JPEG, WebP in its default mode, AVIF) permanently throws data away. It works because human vision is uneven: we are very sensitive to brightness detail and much less sensitive to colour detail and to fine, high-frequency texture. So a JPEG encoder stores colour information at half resolution (chroma subsampling), splits the image into 8×8 blocks, converts each block into a set of frequency patterns, and then stores the fine patterns coarsely or not at all. The quality slider is essentially a dial on how coarsely those frequencies are rounded. At high quality the rounding is so slight that the discarded detail was invisible anyway; at low quality whole frequency bands vanish and the underlying blocks start to show.
Lossless compression (PNG, GIF, WebP lossless) keeps every pixel exactly. It can only save space by describing repetition more efficiently — runs of identical pixels, rows that predict the next row, a limited set of colours. That works brilliantly on flat graphics, screenshots, diagrams and text, where large areas really are identical. It works badly on photographs, where practically no two neighbouring pixels are the same, which is why a photo saved as PNG is usually several times bigger than the same photo as JPEG.
This tool decodes your file into a canvas and re-encodes it with the browser's own encoder via canvas.toBlob(). That means the output is a genuinely new file at the quality you asked for, not a repackaged original.
How much quality can you lose before it shows?
Rough but reliable guidance for photographs, using the 0–1 scale on the slider:
- 0.9–1.0 — visually identical to the original, but the file is much larger than it needs to be. Only worth it for images that will be edited again afterwards.
- 0.75–0.85 — the sweet spot. For nearly all photos this is indistinguishable from the original at normal viewing size, while typically cutting the file to a fifth or less of a camera JPEG.
- 0.6–0.7 — still fine for thumbnails and background images, but you will start to see faint banding in smooth gradients: skies, out-of-focus backgrounds, studio backdrops, skin tones.
- Below 0.5 — visible damage. Blocky 8×8 squares appear in flat areas and a halo of mosquito noise gathers around hard edges, especially text, logos and anything overlaid on a photo.
Two caveats. First, images with text or sharp graphics break down much earlier than photographs — if there is a caption burned into the picture, stay at 0.85 or higher, or use PNG. Second, WebP at the same numeric quality is generally a little smaller and degrades more gracefully than JPEG, so a WebP at 0.7 often looks better than a JPEG at 0.7. If your audience is on browsers from the last several years, WebP is the better default.
Why resizing often beats compressing
The single biggest saving is usually not the quality slider at all — it is the pixel count. A modern phone photo is around 4000 px wide. If that image ends up in a blog post displayed 800 px wide, you shipped roughly 25 times more pixels than the screen can show. No quality setting can rescue that, because you are paying for detail that is thrown away by the browser at display time.
File size scales with area, so halving the width quarters the pixel count. Going from 4000 px to 1600 px removes about 84% of the data before the encoder even starts, and the result looks sharper than a 4000 px image squeezed to the same file size with an aggressive quality setting. Practical targets: 1600–2000 px for a full-width hero image, 1000–1200 px for an in-article image, 400–600 px for thumbnails, 1080 px for most social platforms. Double those numbers only if you specifically need crisp results on high-density retina displays.
Use the “limit the width” option here for a quick cap, or our dedicated image resizer when you need exact dimensions or a specific aspect ratio.
Is my image uploaded?
No. Your files are read with the browser's File API, drawn onto an HTML5 canvas and re-encoded locally with canvas.toBlob(). There is no upload step, no server-side processing and no copy of your image anywhere but your own device — you can disconnect from the internet after the page loads and the tool still works. That also means it is safe for screenshots containing personal data, documents and client work. Details in our Privacy Policy.
Frequently asked questions
Why did my PNG get bigger?
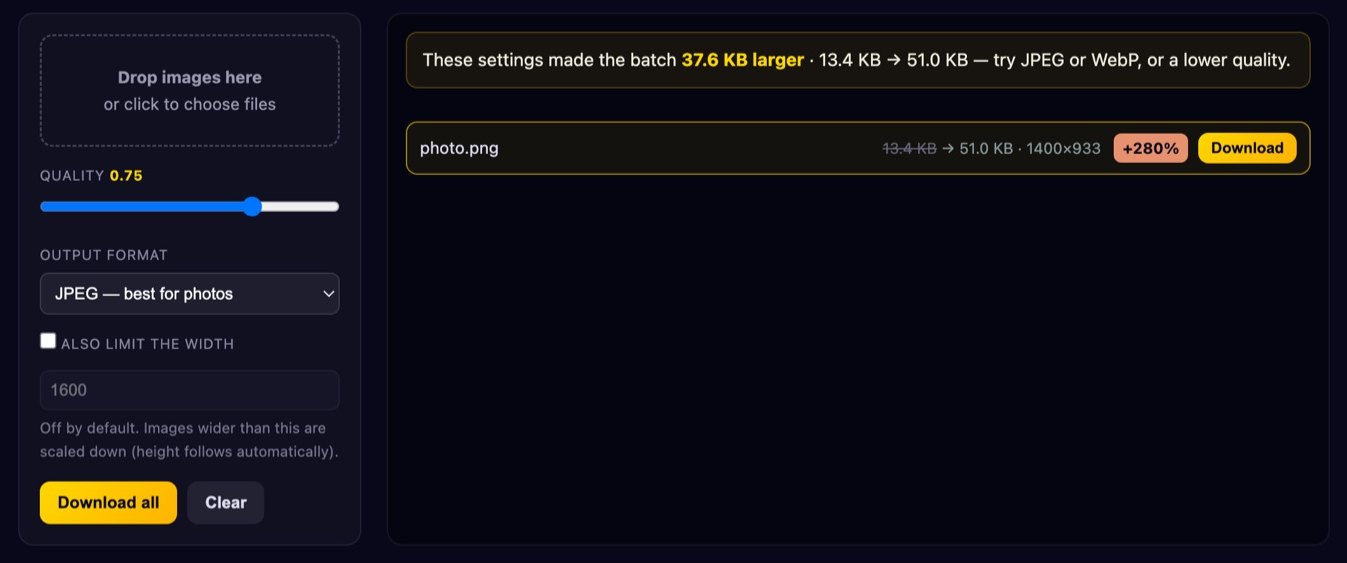
Two common causes. The first is converting a photograph to PNG: PNG is lossless, so it has to store every last sensor-noise pixel, and a JPEG photo turned into a PNG regularly grows five to ten times. The second is re-encoding something that was already well compressed — if a designer already optimised that PNG with a reduced colour palette, the browser's generic encoder will write a full 24-bit file and end up larger. If a file grows, keep the original; the tool always shows you both sizes so you can tell.
Does compressing twice make it smaller?
Barely smaller and noticeably worse. Every lossy pass re-quantises an image that already has compression artefacts baked in, so errors accumulate. Always compress from the highest-quality original you have rather than from a file you compressed yesterday.
Does this remove EXIF data?
Yes, as a side effect. Because the image is redrawn on a canvas and re-encoded from raw pixels, metadata such as GPS coordinates, camera model and timestamps is not carried over. That is good for privacy, but if you need to keep copyright or camera data, keep an untouched copy of the original.
Is transparency preserved?
With PNG and WebP, yes. JPEG has no alpha channel at all, so transparent areas are flattened — typically to black. If your image has a transparent background, choose PNG or WebP.
Is there a file size or count limit?
There is no artificial limit, but everything runs in your browser's memory, so very large batches or images beyond roughly 50 megapixels can be slow on modest hardware. If a big batch stalls, split it into groups of ten to twenty files.
Next steps: change dimensions with the image resizer, switch between PNG, JPEG and WebP with the image converter, or browse everything else in our free tools.